Email Deliverability Guide
Follow this guide to ensure your emails get delivered 100% of the time.

Steps in this guide
(Click each button to jump to section)
Email Deliverability Guide
Follow this guide to ensure your emails get delivered 100% of the time.
Steps in this guide
(Click each button to jump to section)
Before you get started
When it comes to email marketing, it's important to put in mind that"you're guilty until proven innocent". Email providers like Gmail and Outlook will, by default, put you in the "Spam prison" until you've proven to them you're giving their clients (your list) valuable and never-to-miss emails.
When you're getting started, you are given a "domain reputation" you have to gradually build up following certain rules. This guide is packed with techniques and best practices to ensure your emails escapes the prison as soon as possible.
These rules often change so you can expect us to give you an updated version of this guide (or maybe add new ones) to help you improve email deliverability.
Default Email Settings
Your CRM has default settings that ensures you stay compliant.
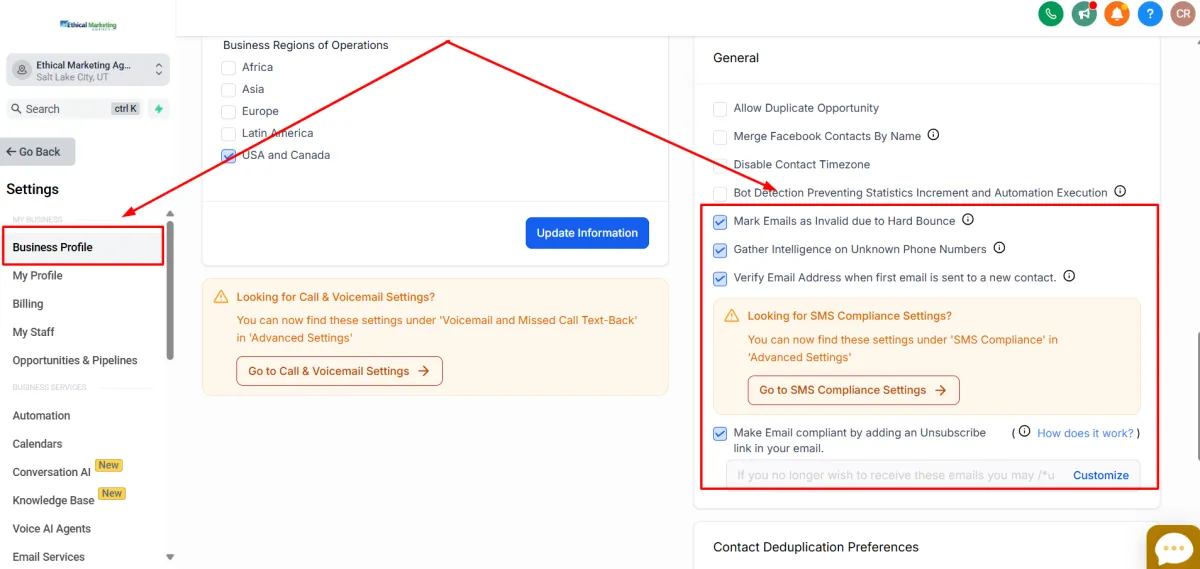
Go to Settings > Business Profile > General
We do NOT advise changing or modifying any of these settings until you have a working system to replace them.
Default Email Settings
Your CRM has default settings that ensures you stay compliant.
Go to Settings > Business Profile > General
The following should be checked:
Mark Emails as Invalid due to Hard Bounce
Gather Intelligence on Unknown Phone Numbers
Verify Email Address when first email is sent to a new contact
Make Email compliant by adding an Unsubscribe link in your email
We do NOT advise changing or modifying any of these settings until you have a working system to replace them.
Setting up a Subdomain
Before you can send your emails, you need to set up your email sending subdomain. You're going to be using this domain to send emails to your list.
This is the subdomain you're building your reputation on. We advise to use a subdomain instead of your main/root domain because it's easier to replace a subdomain when it goes bad.
The instructions below will show you how to set this up.
1. Creating your subdomain name.
A subdomain is an extra component of your main (or "root") domain with a prefix to that domain (e.g. email.ethicalmarketingage
ncy.com).
We suggest using easy-to-understand prefixes for your email sending subdomain. Below are a few common email sending subdomains people use:
email (yourname@email.yourdomain.com)
mail (yourname@mail.yourdomain.com)
news (yourname@news.yourdomain.com)
single letters such as "e" or "m" (yourname@e.yourdomain.com, yourname@m.yourdomain.com) for simplicity
Adding DNS records.
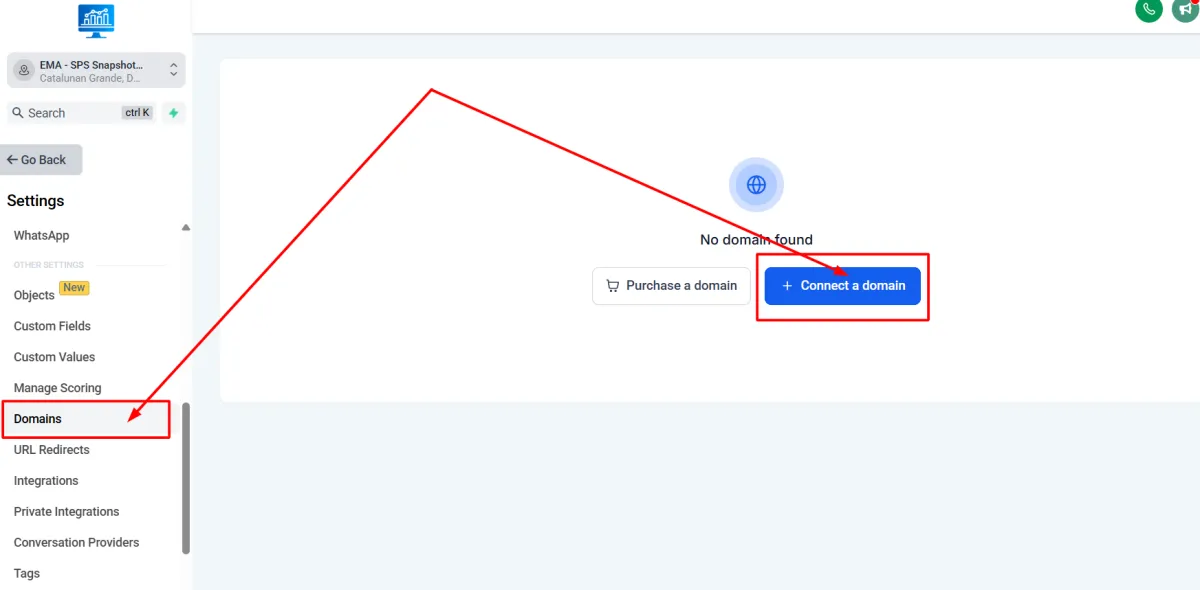
Once you have decided on your subdomain name, you can start the integration. Go to Settings > Domains > Connect a domain
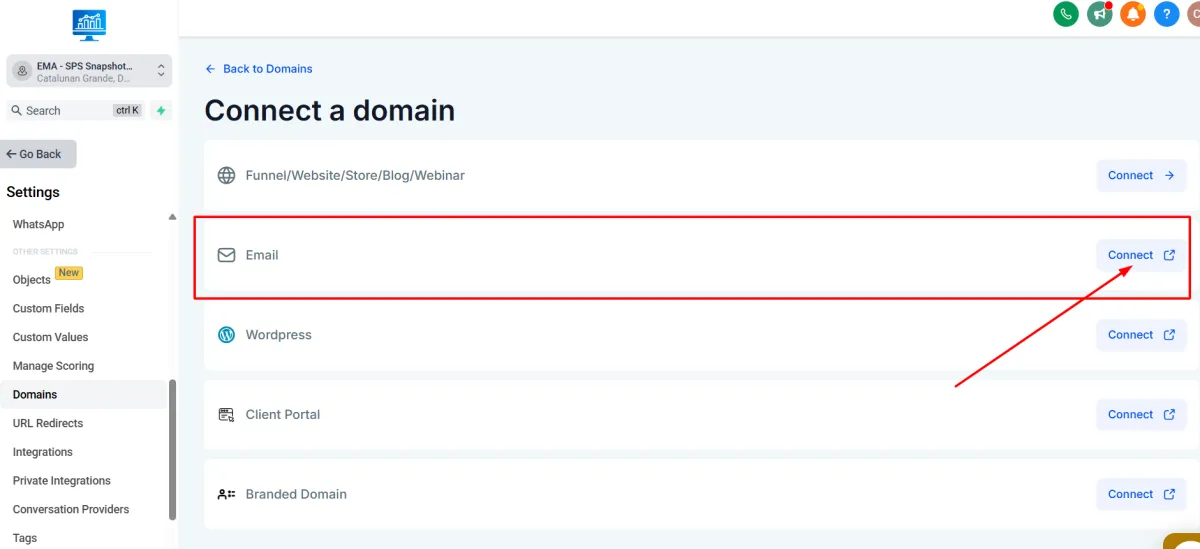
The page below will then open. Click on the "Connect" button where it says Email.
Once you have decided on your subdomain name, you can start the integration. Go to Settings > Domains > Connect a domain.
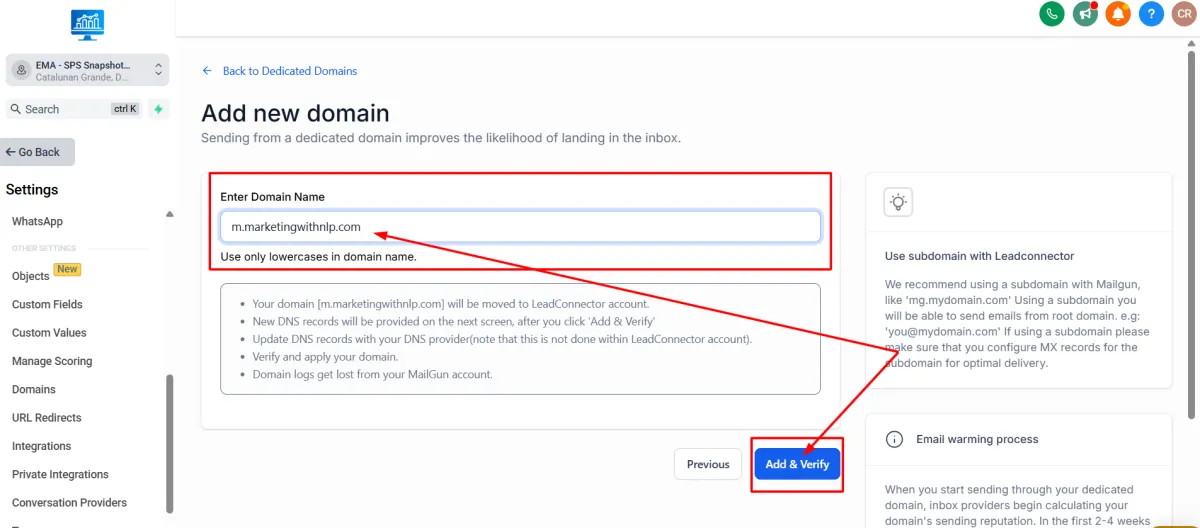
Enter your chosen subdomain name in the box that says "Add new domain". After that click on the button the says "Add & Verify".
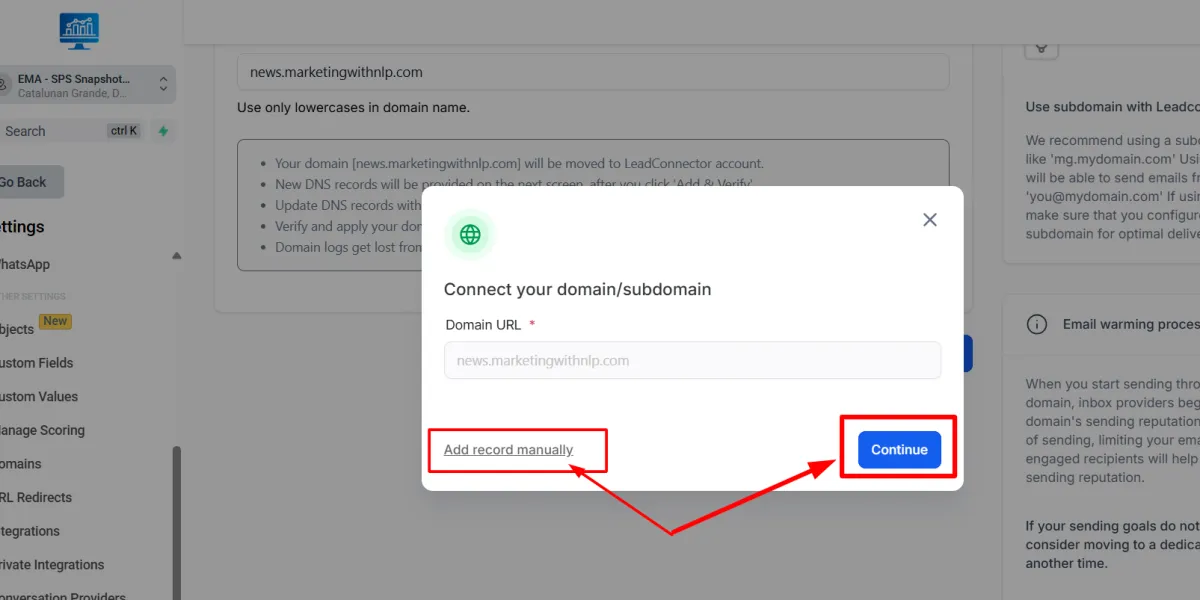
A pop-up box will open. If you're using GoDaddy or CloudFlare as your domain provider, you can click on "Continue". You'd be prompted to log in and connect "Lead Connector" (which is our CRM's name on the backend). Just click on the continue button until you get to the success page.
If you are using a domain provider outside of GoDaddy or CloudFlare, you can click on the hyperlinked text that says "Add record manually".
As soon as you've clicked that button, a new pop-up box will open. From the box, you have to copy and paste the DNS records to your Domain Provider.
We have shared video tutorials for some of the most popular domain registrars.
[ Watch: How to add DNS records in NameCheap ]
[ Watch: How to add DNS records in Bluehost ]
[ Watch: How to add DNS records in Domain.com ]
[ Watch: How to add DNS records in Google Domains ]
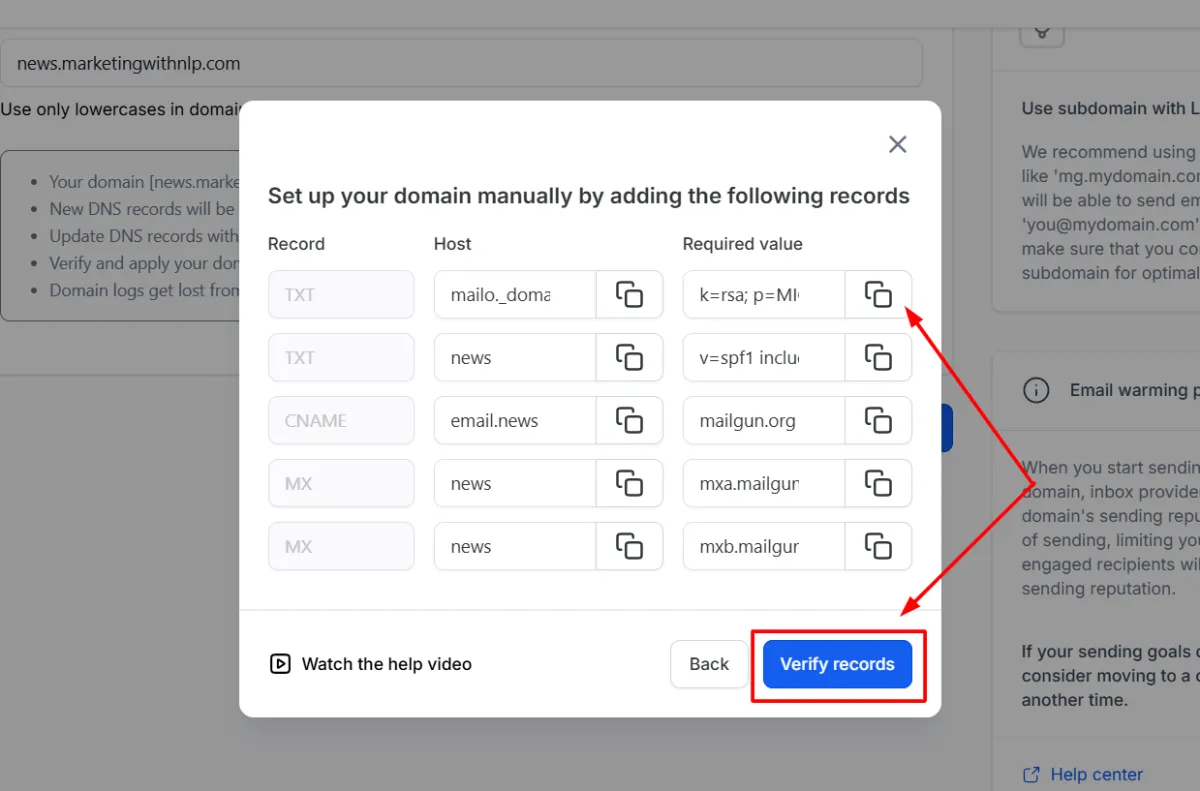
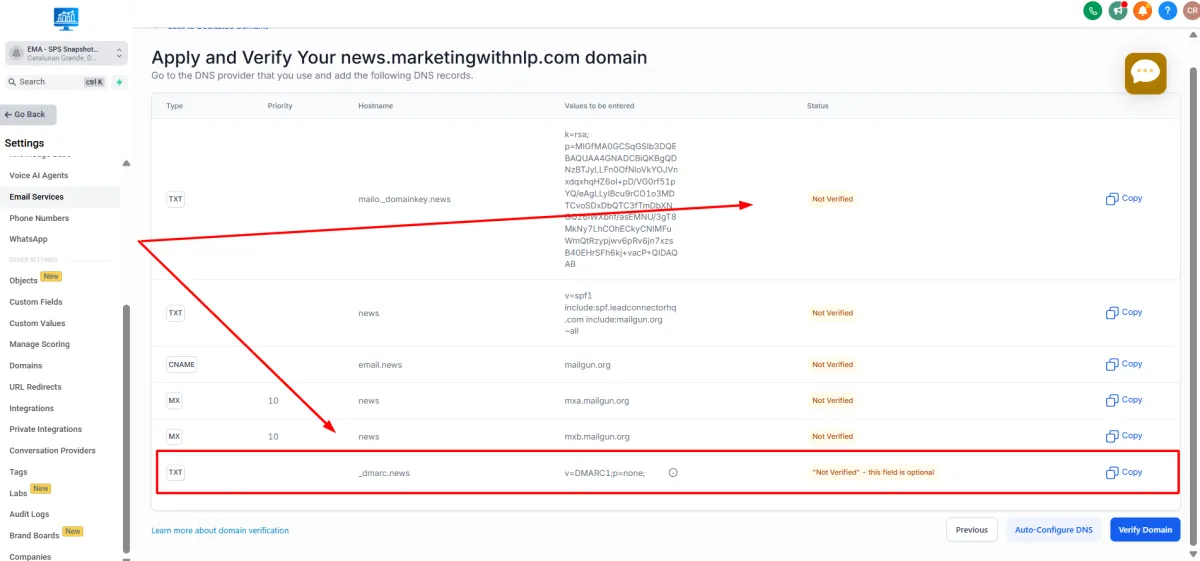
3. Verify your domain. As soon as you're done adding all records, click on the "Verify records" button and it will take you to the Email Services page. You'll see that the records you have recently added will say "Not Verified". Moreover, there's a new record to add at the bottom of the page called "_dmarc".
It will say the DMARC record is optional, but it's necessary to ensure your emails get delivered. Go back to your domain provider and add the DNS record for DMARC.
Once you're done, click on the "Verify Domain" button. Some domain providers (registrars) take longer to verify new DNS records but it'd typically take just less than 5 minutes for most. If you're still not getting verified, go back and check if you've added the Domain records correctly.
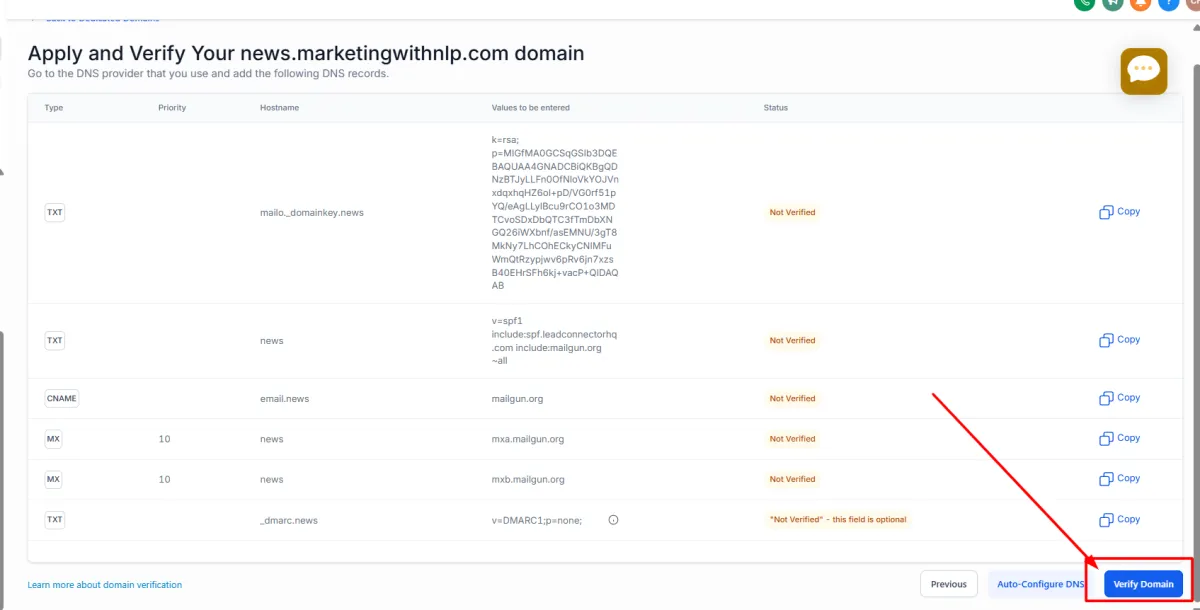
If you need to go back to this screen later on, go to Settings > Email Services > Dedicated Domain and IP and then choose your domain from the list. Click on the 3 dots and choose "Verify domain".
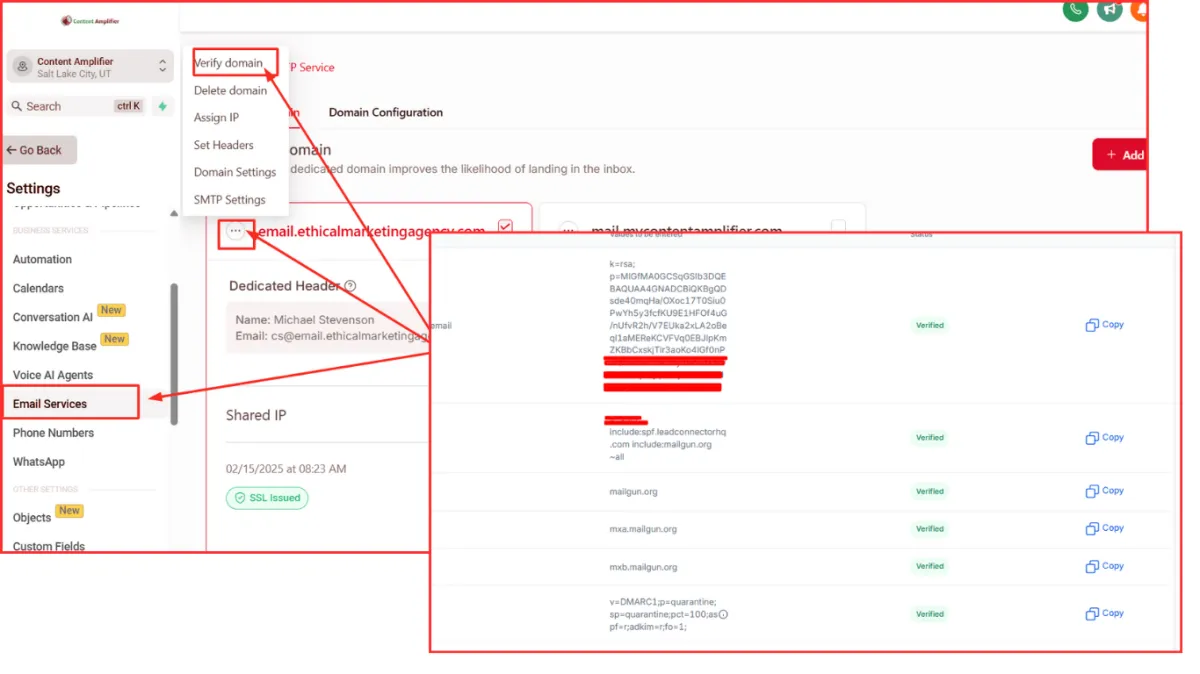
When all your DNS records say "verified", you're all set! Let's move on over to the next step!
Setting up a Subdomain
Before you can send your emails, you need to set up your email sending subdomain. You're going to be using this domain to send emails to your list.
This is the subdomain you're building your reputation on. We advise to use a subdomain instead of your main/root domain because it's easier to replace a subdomain when it goes bad.
The instructions below will show you how to set this up.
1. Creating your subdomain name.
A subdomain is an extra component of your main (or "root") domain with a prefix to that domain (e.g. email.ethicalmarketingagency.com).
We suggest using easy-to-understand prefixes for your email sending subdomain. Below are a few common email sending subdomains people use:
email (yourname@email.yourdomain.com)
mail (yourname@mail.yourdomain.com)
news (yourname@news.yourdomain.com)
single letters such as "e" or "m" (yourname@e.yourdomain.com, yourname@m.yourdomain.com)
Adding DNS records.
Once you have decided on your subdomain name, you can start the integration. Go to Settings > Domains > Connect a domain
The page below will then open. Click on the "Connect" button where it says Email.
Once you have decided on your subdomain name, you can start the integration. Go to Settings > Domains > Connect a domain.
Enter your chosen subdomain name in the box that says "Add new domain". After that click on the button the says "Add & Verify".
A pop-up box will open. If you're using GoDaddy or CloudFlare as your domain provider, you can click on "Continue". You'd be prompted to log in and connect "Lead Connector" (which is our CRM's name on the backend). Just click on the continue button until you get to the success page.
If you are using a domain provider outside of GoDaddy or CloudFlare, you can click on the hyperlinked text that says "Add record manually".
As soon as you've clicked that button, a new pop-up box will open. From the box, you have to copy and paste the DNS records to your Domain Provider.
We have shared video tutorials for some of the most popular domain registrars.
[ Watch: How to add DNS records in NameCheap ]
[ Watch: How to add DNS records in Bluehost ]
[ Watch: How to add DNS records in Domain.com ]
[ Watch: How to add DNS records in Google Domains ]
3. Verify your domain. As soon as you're done adding all records, click on the "Verify records" button and it will take you to the Email Services page. You'll see that the records you have recently added will say "Not Verified". Moreover, there's a new record to add at the bottom of the page called "_dmarc".
It will say the DMARC record is optional, but it's necessary to ensure your emails get delivered. Go back to your domain provider and add the DNS record for DMARC.
Once you're done, click on the "Verify Domain" button. Some domain providers (registrars) take longer to verify new DNS records but it'd typically take just less than 5 minutes for most. If you're still not getting verified, go back and check if you've added the Domain records correctly.
If you need to go back to this screen later on, go to Settings > Email Services > Dedicated Domain and IP and then choose your domain from the list. Click on the 3 dots and choose "Verify domain".
When all your DNS records say "verified", you're all set! Let's move on over to the next step!
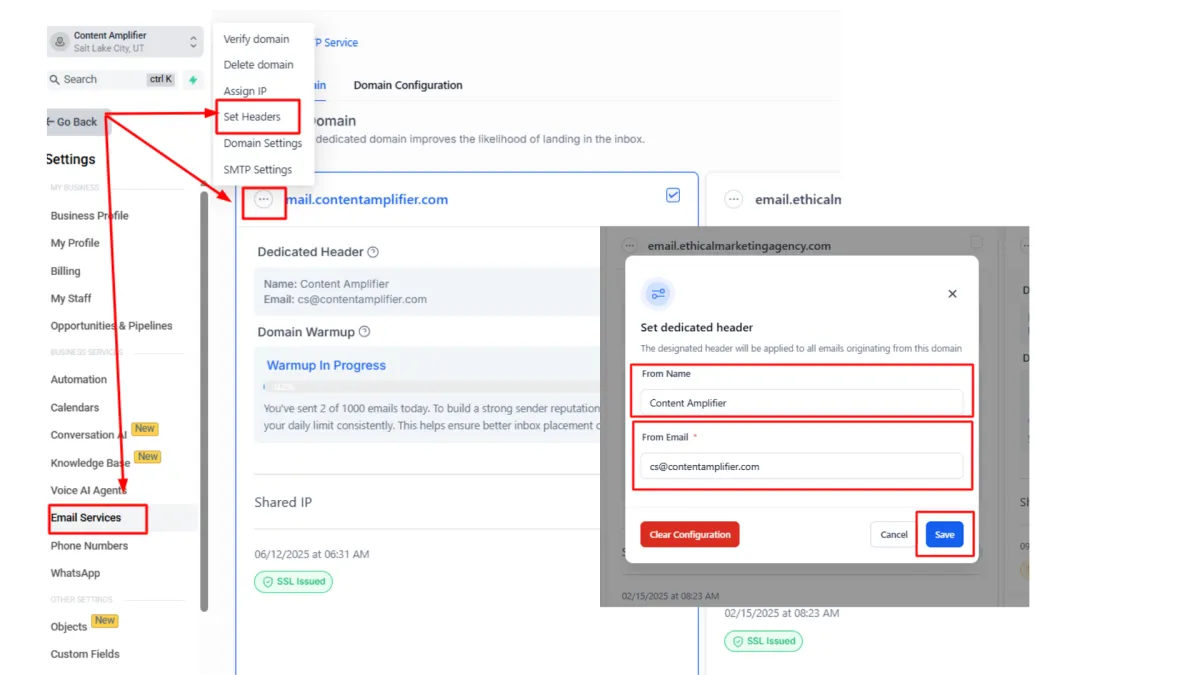
Set up your Default Headers (updated for clarity)
The headers are the "From Name" and "From Email" addresses that will be the default headers the CRM will use in all your emails. Your "From email" should come from a real email that you have.
Sending from the CRM:
With the subdomain you’ve set up (e.g. mail.contentamplifier.com), the CRM can already send emails on your behalf. If someone replies to one of those emails, their reply will show up right inside the CRM under that contact. You don’t need Gmail or Outlook for that part.
Receiving brand-new emails
However, if someone writes a fresh email directly to [email protected] (not a reply) for example, the CRM doesn’t create an inbox to catch that message. For those emails to land somewhere, you’ll need to set up that address as a real mailbox with a provider like Gmail (Google Workspace) or Outlook (Office 365).
Syncing everything together
Once that business inbox exists, we can sync it with the CRM. That way:
Emails you send from the CRM also appear in your Gmail/Outlook “Sent” folder.
Emails that land in your Gmail/Outlook inbox also appear in the CRM, tied to the right contact.
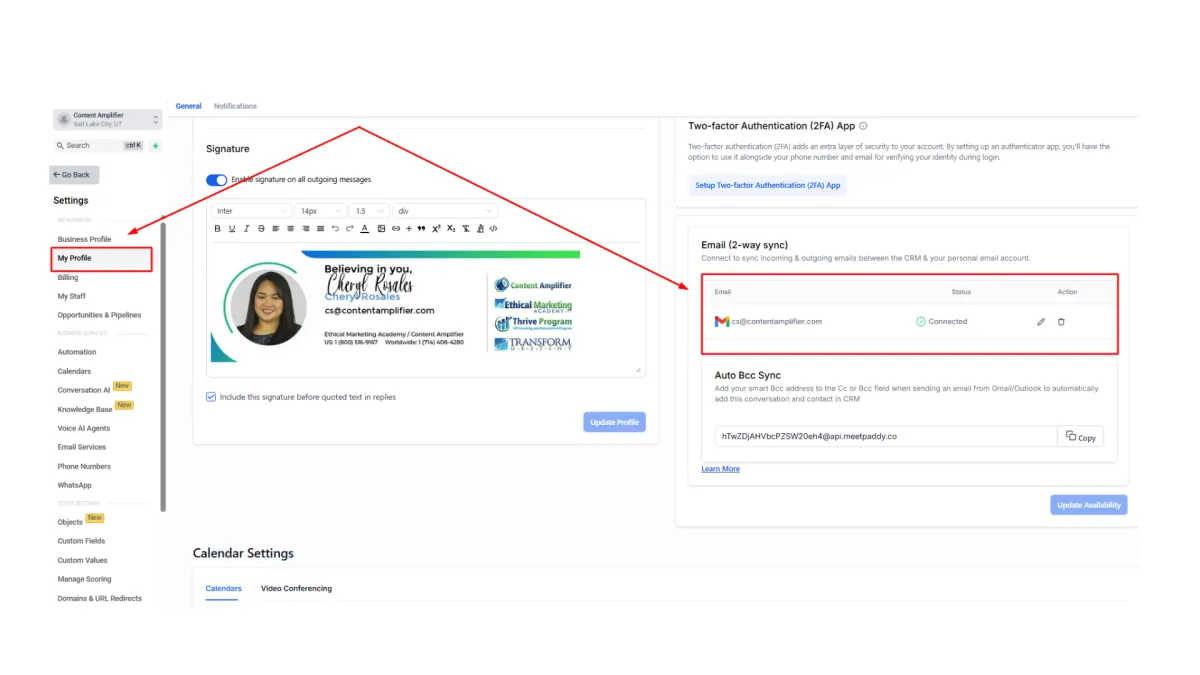
👉 One important note: the CRM will only capture emails that involve addresses already saved as contacts in your CRM. So it won’t automatically pull in all your Gmail/Outlook emails — just the ones tied to known contacts.
After setting up your header, you then have to sync your email. To do this, go to Settings > My Profile > Email 2-Way Sync.
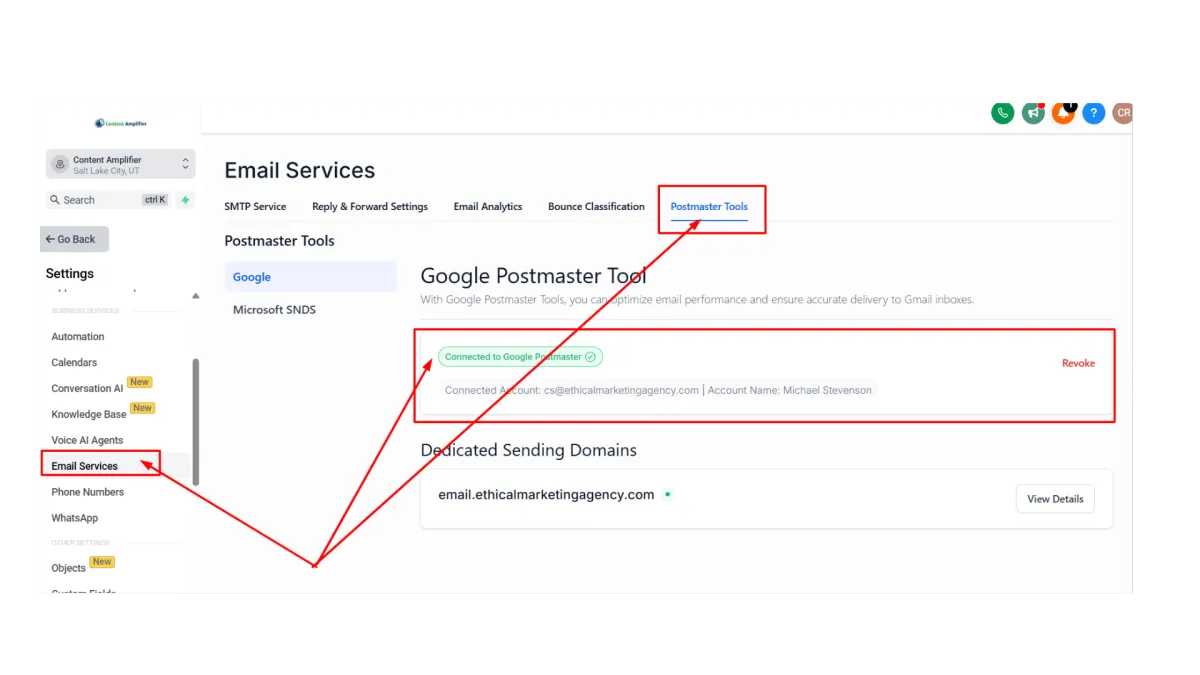
Setting up Google Postmaster
Setting up Google Postmaster Tools gives you visibility into how Gmail treats your emails, helping you identify deliverability issues before they hurt your campaigns.
This free service provides essential data on spam complaints and authentication, which helps maintain high inbox placement rates.
Setting up Google Postmaster Tools gives you visibility into how Gmail treats your emails, helping you identify deliverability issues before they hurt your campaigns.
This free service provides essential data on spam complaints and authentication, which helps maintain high inbox placement rates.
Go to postmaster.google.com and add your DNS records. Make sure you're logged in on the right Google account.
Click the big red "+" button and then on the box, type your email sending subdomain (the same one you set up earlier). It will give you a TXT type of DNS record to add to your domain's DNS settings.
Once that is added, come back to your Google Postmaster page and click on "VERIFY".
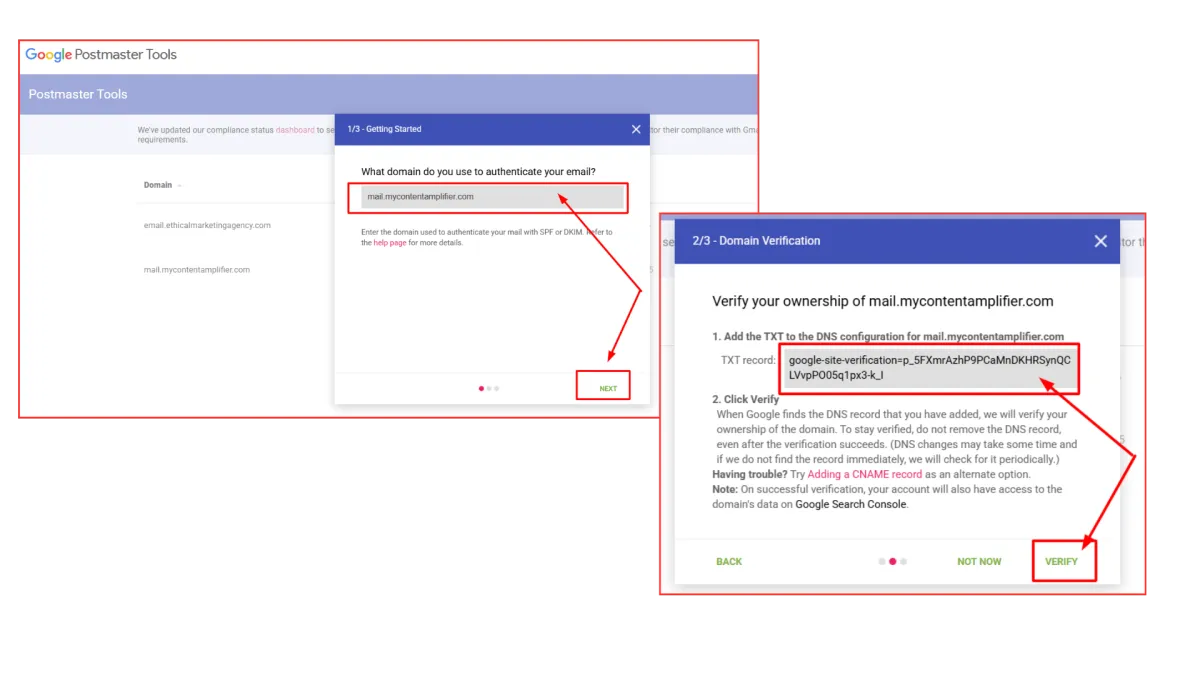
Once your domain is verified, you're all set with Google Postmaster!
Setting up Google Postmaster
Setting up Google Postmaster Tools gives you visibility into how Gmail treats your emails, helping you identify deliverability issues before they hurt your campaigns.
This free service provides essential data on spam complaints and authentication, which helps maintain high inbox placement rates.
Go to postmaster.google.com and add your DNS records. Make sure you're logged in on the right Google account.
Click the big red "+" button and then on the box, type your email sending subdomain. It will give you a TXT type of DNS record to add to your domain's DNS settings.
Once that is added, come back to your Google Postmaster page and click on "VERIFY".
Once your domain is verified, you're all set with Google Postmaster!
Creating Your Master Email Template
The way you structure and format your emails directly impacts brand recognition and whether they reach your subscribers' inboxes.
In this section, we're going to show you how to create a Master email template. This way, all your emails have the same header, subheader, and text. Moreover, you can have several master templates, one for each type of email you send, e.g. Newsletter emails, Promo emails, and Transactional emails (receipts, invoices, etc.).
We'll also show you the essential elements you should include in your master email template - so your emails not only look professional but also gets seen.
Make sure to clone your master template before you edit.
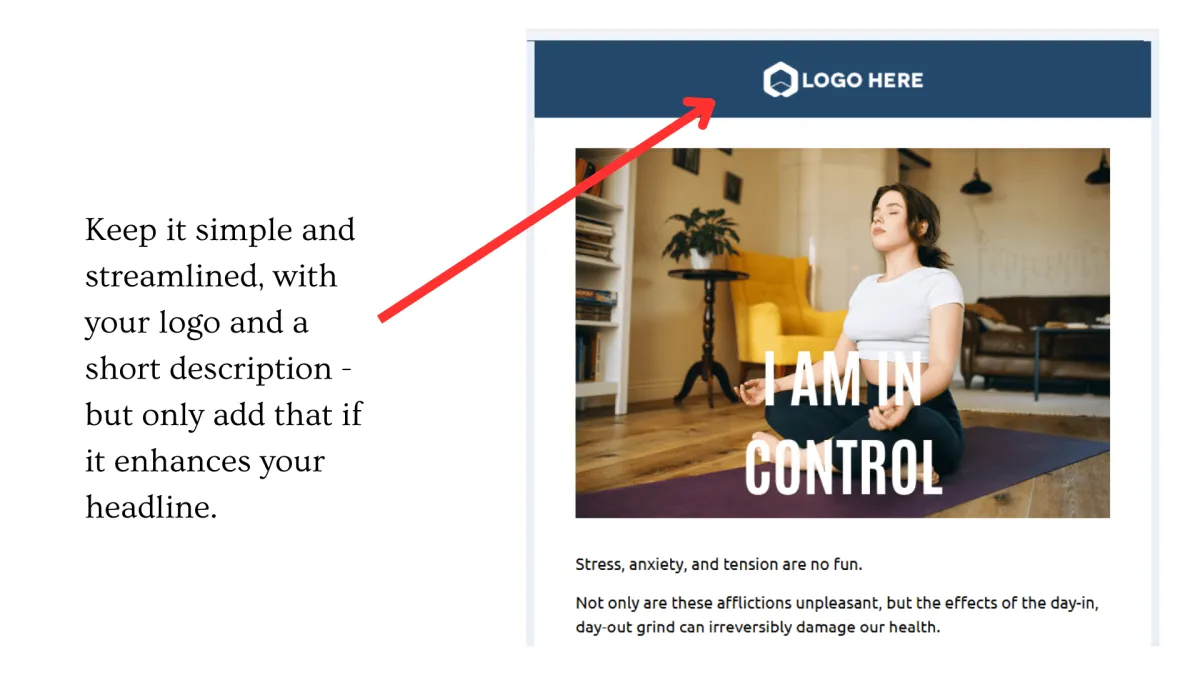
Keep your header components simple.
Your email header should feature your logo and minimal text that doesn't distract from your main message. A cluttered header can overwhelm readers and reduce the impact of your core content.
Place Calls-to-Action strategically
Help your subscribers quickly understand your message by simplifying your email design:
Limit yourself to one primary offer and call-to-action per email
Use different colors to distinguish between multiple CTAs when necessary
Create visual breathing room with line breaks and minimal, high-impact images that make your main CTA pop
Optimize for Mobile-First Design
Design your emails with mobile viewing in mind, using single-column layouts and properly sized images. Use the tablet and mobile view in the email editor to see how your email looks on mobile devices before you send.

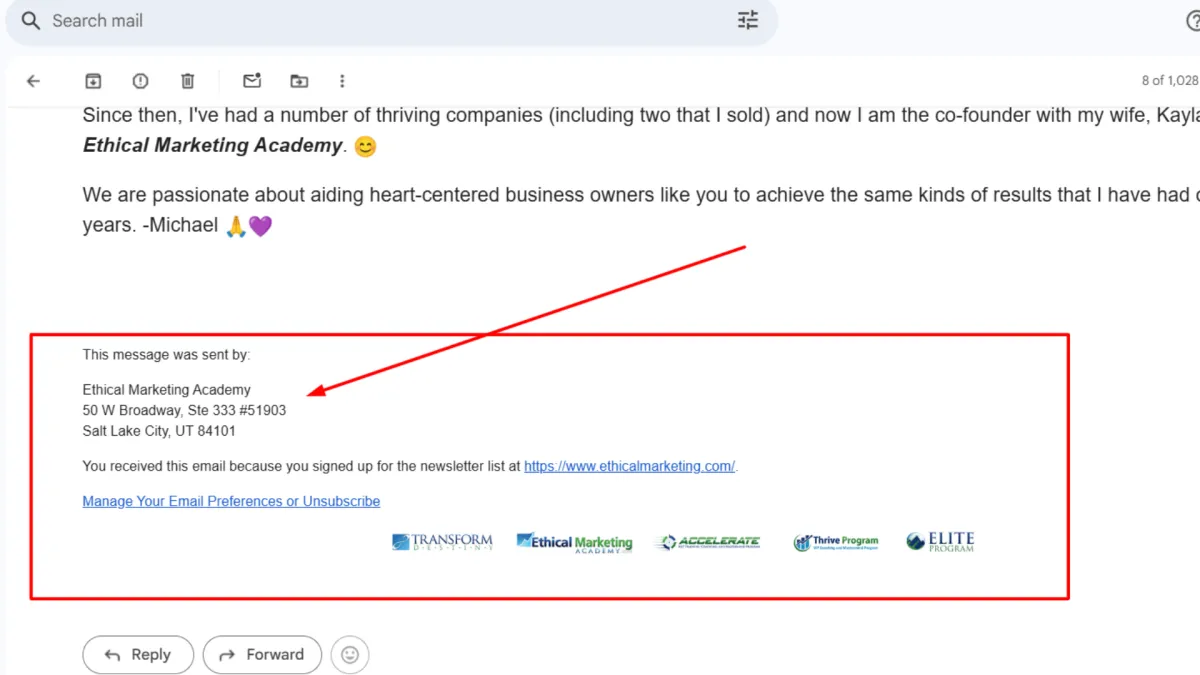
Include your physical mailing address in your signature.
Including your physical mailing address in your email signature isn't just good practice—it's required by law under the CAN-SPAM Act. This transparency builds trust with your subscribers and signals to email providers that you're a legitimate sender who follows regulations.
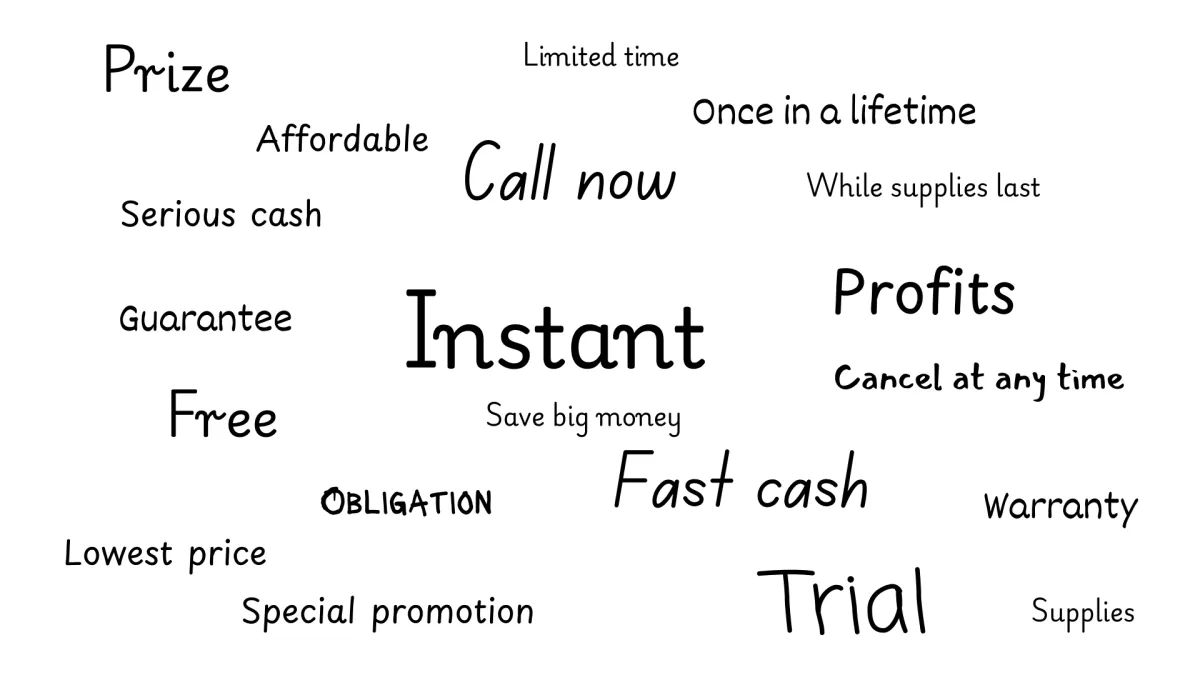
Avoid using Email Spam Trigger Words.
Certain words can trigger spam filters and send your emails straight to the junk folder, including terms like "free," "guaranteed," or phrases creating false urgency. Focus on conversational language that delivers value without relying on high-pressure sales tactics that might alert spam detection systems. Check out the full list here.
Creating Your Master Email Template
The way you structure and format your emails directly impacts brand recognition and whether they reach your subscribers' inboxes.
In this section, we're going to show you how to create a Master email template. This way, all your emails have the same header, subheader, and text. Moreover, you can have several master templates, one for each type of email you send, e.g. Newsletter emails, Promo emails, and Transactional emails (receipts, invoices, etc.).
We'll also show you the essential elements you should include in your master email template - so your emails not only look professional but also gets seen.
Make sure to clone your master template before you edit.
Keep your header components simple.
Your email header should feature your logo and minimal text that doesn't distract from your main message. A cluttered header can overwhelm readers and reduce the impact of your core content.
Place Calls-to-Action strategically
Help your subscribers quickly understand your message by simplifying your email design:
Limit yourself to one primary offer and call-to-action per email
Use different colors to distinguish between multiple CTAs when necessary
Create visual breathing room with line breaks and minimal, high-impact images that make your main CTA pop
Optimize for Mobile-First Design
Design your emails with mobile viewing in mind, using single-column layouts and properly sized images. Use the tablet and mobile view in the email editor to see how your email looks on mobile devices before you send.
Include your physical mailing address in your signature.
Including your physical mailing address in your email signature isn't just good practice—it's required by law under the CAN-SPAM Act. This transparency builds trust with your subscribers and signals to email providers that you're a legitimate sender who follows regulations.
Avoid using Email Spam Trigger Words.
Certain words can trigger spam filters and send your emails straight to the junk folder, including terms like "free," "guaranteed," or phrases creating false urgency. Focus on conversational language that delivers value without relying on high-pressure sales tactics that might alert spam detection systems. Check out the full list here.
Email Testing for better deliverability
Before sending emails to your subscribers, it's crucial to test how your messages will perform. Testing helps identify issues that could send your emails to spam folders.
Simply follow these steps to test your emails:
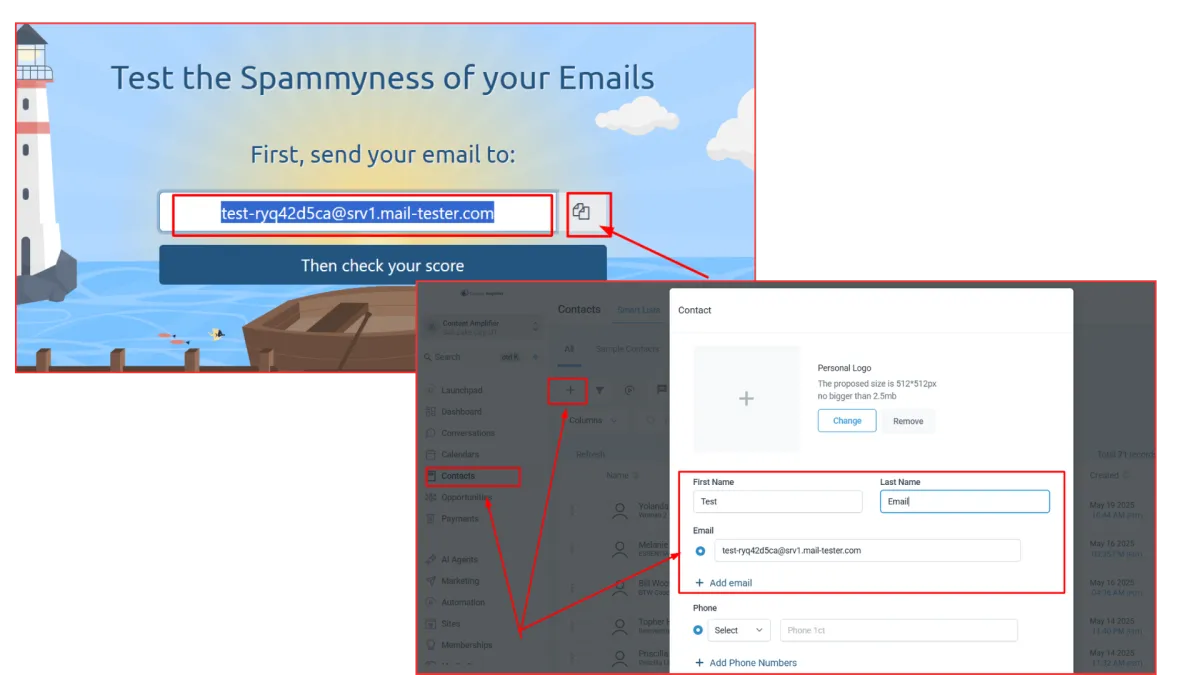
Visit a testing service like Mail-Tester or MailGenius and copy the temporary email address they provide.
Add this test email as a new contact in your PandaDash or GHL subaccount. Go to Contact, click on the + button on the upper left side of the main view. Enter a test first and last name and then paste the email you just copied. Click "Save".
We want to see how your domain performs in all types of emails. So we're sending a real email using any of these methods:
Manually send from the Conversations tab
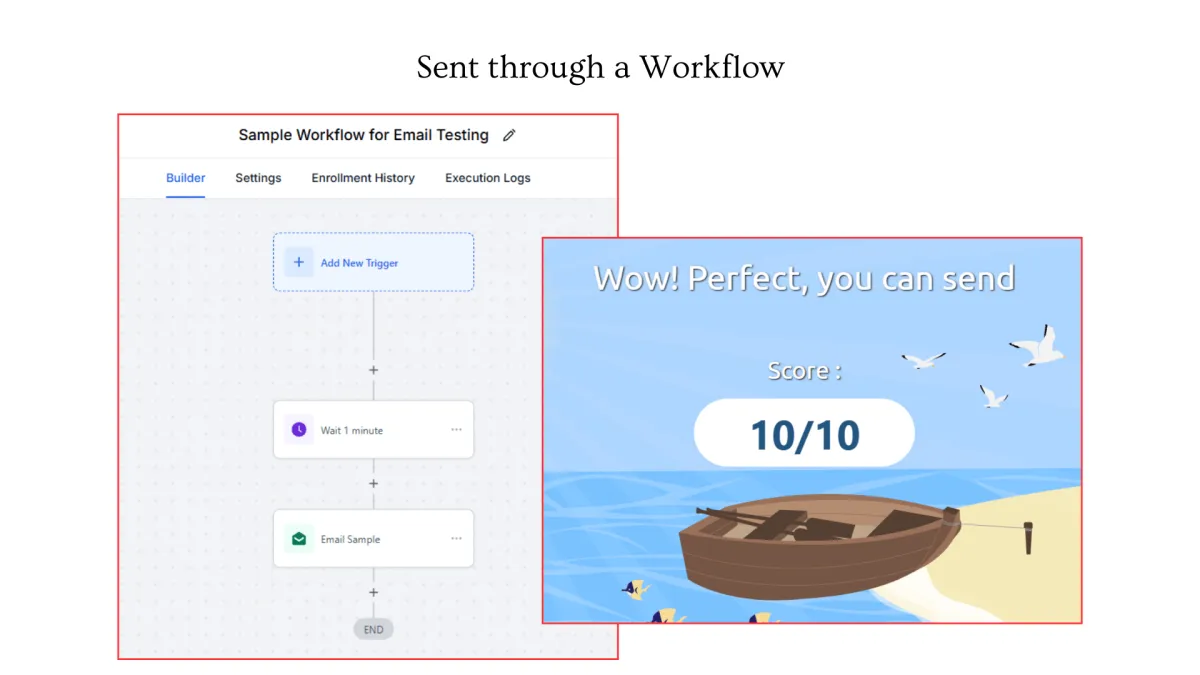
Create a test workflow with a single "Send Email" step. [ Read: How to create a workflow ]
Include it in a scheduled campaign broadcast. [ Read: How to create a campaign ]
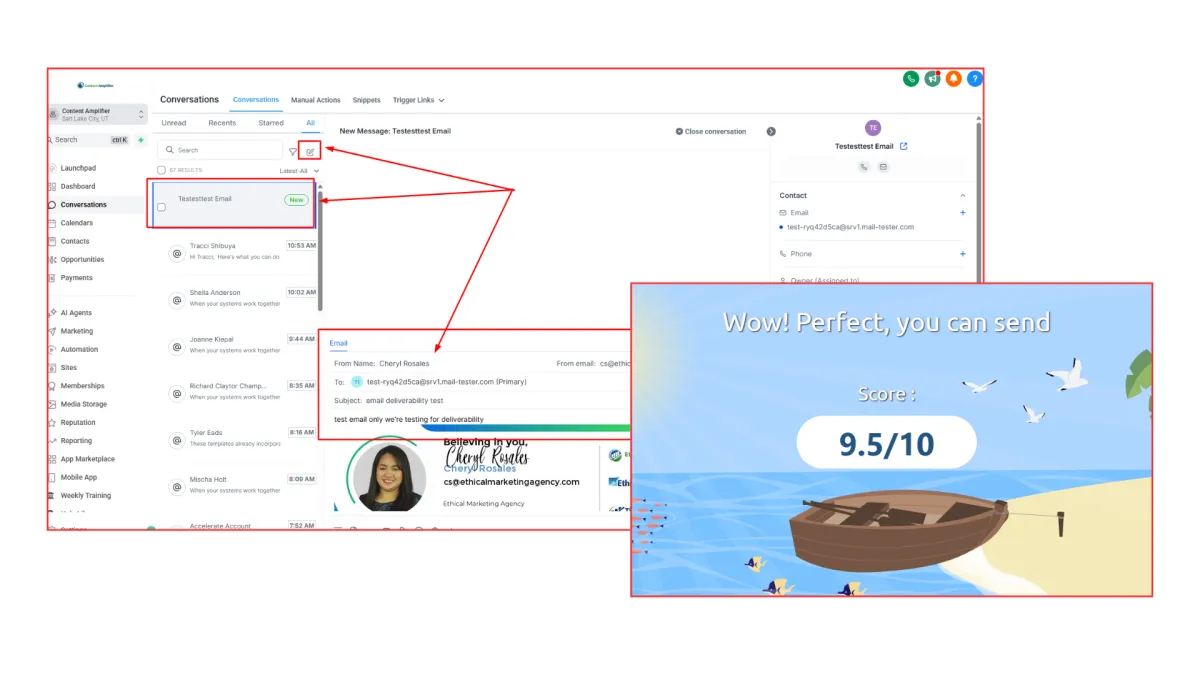
Check the results on the testing service to see your deliverability score and identify any issues that need fixing.
Testing each email template ensures you catch problems before they affect your actual campaigns.
Email Testing for better deliverability
Before sending emails to your subscribers, it's crucial to test how your messages will perform. Testing helps identify issues that could send your emails to spam folders.
Simply follow these steps to test your emails:
Visit a testing service like Mail-Tester or MailGenius and copy the temporary email address they provide.
Add their given test email as a new contact in your CRM. Go to Contact, click on the + button on the upper left side of the main view. Enter a test first and last name and then paste the email you just copied. Click "Save".
We want to see how your domain performs in all types of emails. So we're sending a real email using any of these methods:
Manually send from the Conversations tab
Create a test workflow with a single "Send Email" step. [ Read: How to create a workflow ]
Include it in a scheduled campaign broadcast. [ Read: How to create a campaign ]
Check the results on the testing service to see your deliverability score and identify any issues that need fixing.
Testing each email template ensures you catch problems before they affect your actual campaigns.
List Migration How-tos and Best Practices
Moving your subscriber list from one platform to another requires careful planning to protect your sender reputation. Simply importing all contacts at once can trigger spam filters and hurt your deliverability.
In the following sections, we'll show you the best practices in migrating your list in the CRM.
Do not include people who have not engaged in a long time, or put them on a separate list.
If you’re migrating from an existing CRM or email marketing software, it’s best not to include the people from your list who have not been engaged in 6+ months. Moreover, it's much safer to NOT include people who already unsubscribed in the past.
Segment your list according to their engagement activity.
Create a list for 30-day, 60-day, and 90-day timeframe for when they were last engaged (opened or clicked an email). Those who belong in the 30-day list can be included in your seed list to warm up your inbox. The best way to segment is to create tags and create smartlists.
[ Read: How to import contacts in your CRM ]
[ Read: Using tags to segment your list ][ Read: How to create a smartlist ]
List Migration How-tos and Best Practices
Moving your subscriber list from one platform to another requires careful planning to protect your sender reputation. Simply importing all contacts at once can trigger spam filters and hurt your deliverability.
In the following sections, we'll show you the best practices in migrating your list in the CRM.
Do not include people who have not engaged in a long time, or put them on a separate list.
If you’re migrating from an existing CRM or email marketing software, it’s best not to include the people from your list who have not been engaged in 6+ months.
Moreover, it's much safer to NOT include people who already unsubscribed in the past.
Segment your list according to their engagement activity.
Create a list for 30-day, 60-day, and 90-day timeframe for when they were last engaged (opened or clicked an email). Those who belong in the 30-day list can be included in your seed list to warm up your inbox.
The best way to segment is to create tags and create smartlists.
[ Read: How to do import contacts in your CRM ]
[ Read: Using tags to segment your list ][ Read: How to create a smartlist ]
Warming Up Your Seed List
Email warming establishes your credibility with email providers by demonstrating consistent, legitimate sending behavior. This gradual trust-building process strengthens your sender reputation and ensures better inbox placement for future campaigns.
Setup Requirements Before You Start
Set up your email sending subdomain
Use a new email address like [email protected] that hasn't sent emails before
Make sure you can receive replies at your sending email address
Add your domain to Google Postmaster Tools to track how Gmail sees your emails
Week 1: Start Small with Engaged Contacts
Begin with 15-20 contacts who know you and are likely to open your emails
Send only 5-10 emails daily, spreading them between morning and afternoon
Ask questions or include calls-to-action that encourage people to reply back
Watch for bounced emails and spam complaints every day
Respond to replies personally to show you're a real person
Weeks 2-3: Gradually Increase Volume
Boost to 20-50 emails per day while maintaining good engagement
Organize your contacts into different groups or lists
Focus on helpful content like tips and resources rather than sales pitches
Test different subject lines to see what works best
Week 4 and Beyond: Scale to Normal Sending
Increase to 75-150+ emails daily if people continue engaging well
Keep using automated email sequences that provide value
Slowly introduce promotional content once your reputation is established
Consider using different sender names if managing multiple accounts
Encourage Whitelisting
Getting your subscribers to whitelist your email address ensures your messages consistently reach their inbox instead of getting filtered to spam or promotions folders.
How to Encourage Whitelisting:
It's important to remember that email providers can detect when you send emails to a list. So at best your emails are going to land in the "Promotions" folder. Your open rates are going to be low as you're starting out. This is why we highly encourage whitelisting.
Include simple instructions in your welcome email asking subscribers to add your email to their address book
Provide step-by-step whitelisting guides for major email providers (Gmail, Outlook, Yahoo) on your website
Remind subscribers in your email footer to "add us to your contacts" for better delivery
Send periodic reminders during your email sequences, especially if you notice declining open rates
When subscribers whitelist your address, email providers recognize this as a strong signal that your content is wanted and valued, significantly improving your overall deliverability rates.
Congratulations! You've reached the end.
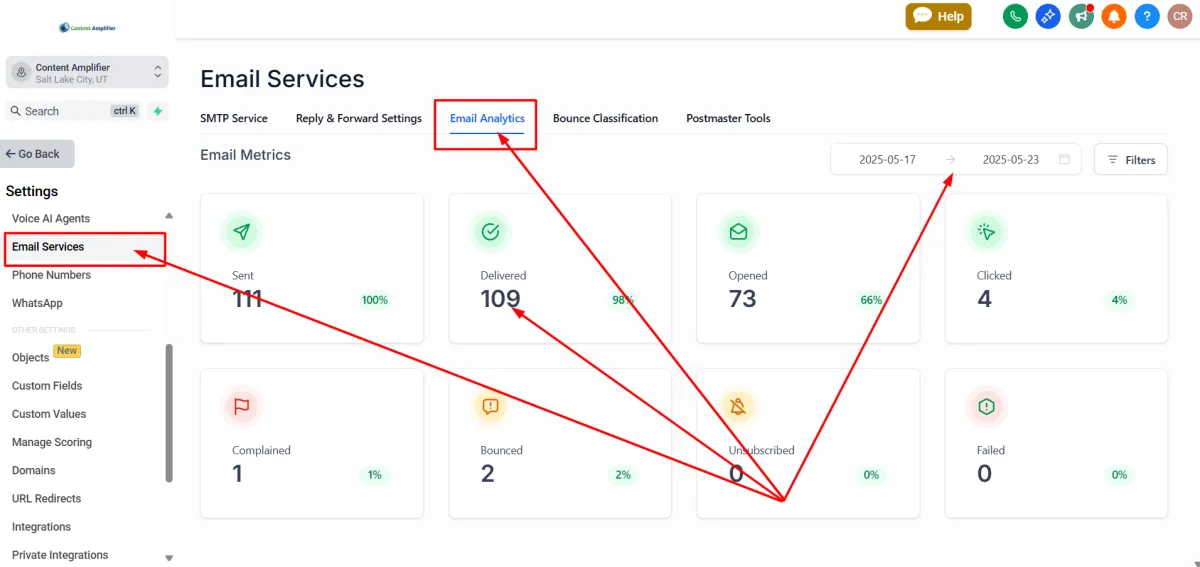
Setting up your CRM for email deliverability is a continuous process. It's a marathon. Continue to monitor your email deliverability. After doing all this, you should have at least 95% deliverability. Otherwise, you probably need to clean up your list and remove anything that bounced.
You can monitor your email statistics right within the CRM, go to Settings > Email Services > Email Analytics.
Encourage Whitelisting
Getting your subscribers to whitelist your email address ensures your messages consistently reach their inbox instead of getting filtered to spam or promotions folders.
How to Encourage Whitelisting:
It's important to remember that email providers can detect when you send emails to a list. So at best your emails are going to land in the "Promotions" folder.
Your open rates are going to be low as you're starting out. This is why we highly encourage whitelisting.
Include simple instructions in your welcome email asking subscribers to add your email to their address book
Provide step-by-step whitelisting guides for major email providers (Gmail, Outlook, Yahoo) on your website
Remind subscribers in your email footer to "add us to your contacts" for better delivery
Send periodic reminders during your email sequences, especially if you notice declining open rates
When subscribers whitelist your address, email providers recognize this as a strong signal that your content is wanted and valued, significantly improving your overall deliverability rates.
Congratulations! You've reached the end.
Setting up your CRM for email deliverability is a continuous process. It's a marathon. Continue to monitor your email deliverability. After doing all this, you should have at least 95% deliverability. Otherwise, you probably need to clean up your list and remove anything that bounced.
You can monitor your email statistics right within the CRM, go to Settings > Email Services > Email Analytics.